Editing a license expiration
-
On the Reports – Tenant License Expiration page, click the Actions (
 ) menu on the desired row and select Edit.
-
In the dialog that appears, select the last edit icon (
 ), License expirations.
-
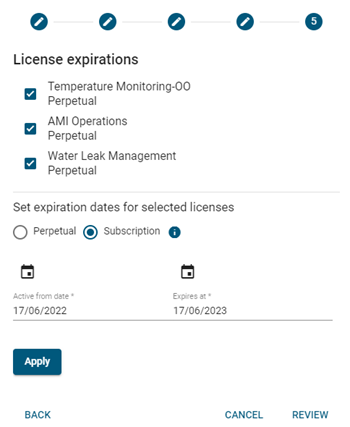
All licenses and their active periods are listed and selected under License expirations. Select only the licenses that you wish to edit.
-
If there is no expiration date, select Perpetual. To include an expiration date, select Subscription, click the Expires at dropdown to reveal a calendar, select the day for the license to expire.
Note: License activations and expirations take effect at 12:00 AM (midnight) UTC time.
-
Click Apply. The changes appear in the list.
-
Click Review. On the Review Tenant update screen, you have the option to remove any of the listed outcomes and applications by clicking the Remove icon (
 ) next to an existing outcome.
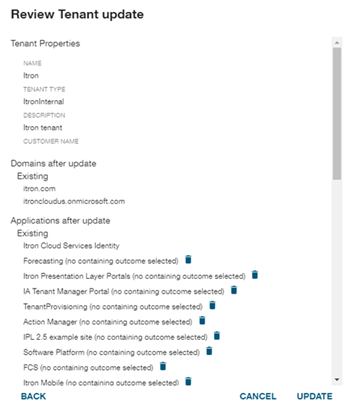
-
To save your changes, click Update.
-
Click Review to view tenant information and all of your updates. To make any changes, click Back to navigate to previous steps. To proceed, click Update.
-
The Updating tenant screen displays the update progress. When it has finished, click Continue.
-
In the Tenant update - summary dialog, click the Information copy icon (
 ). The tenant administrator's ID, username, password, and related items are copied to your clipboard. Paste this information immediately to a text file and save in a secure location. Alternatively, click the adjacent download icon (
 ) to retrieve and save this information as a text file (saved to your browser's default download folder).
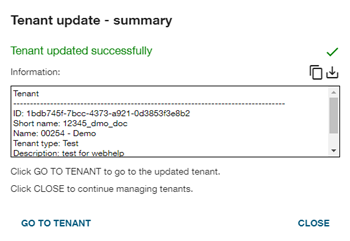
-
Click Close to exit the tenant update wizard.
Note: See also Tenant licenses.