Filters (Reports – License history)
The page header of the Reports – License History page features a Filter icon. A green check mark on the icon indicates that at least one filter is being applied to the current view.
![]()
When navigating to the page from the View Menu, you will see that no filters are initially applied to the view. To view all filters and filter options, click the Filter icon (![]() ) in the page header to open the Filters pane alongside the table.
) in the page header to open the Filters pane alongside the table.
|
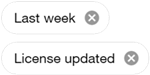
Important! All currently applied filters are listed as chips at the top of the Filters pane.
To remove any filter, click the x on its filter chip. To remove all filters, click Clear All beneath the chips. |
If any filter option is selected within a filter category, a green check icon ( ) in the category's panel header indicates that an available filter in that category is currently in effect (for example, Date and License event type).
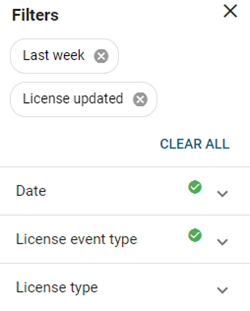
To enable a filter, click the applicable panel header to expand the panel (if it's not already open) and select your filter criteria:
-
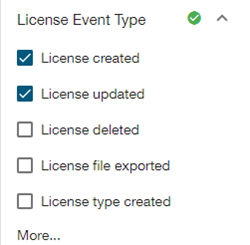
If the options include check boxes, then one or more selections can be made, as in the License event type panel.
Tip: Click More within a panel to open a pop-up window with a larger view of all filters, categories, and options. You can make changes within this window. After making your changes, click Apply.
-
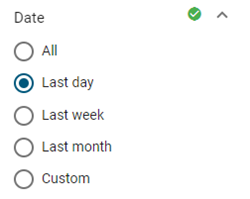
If the options include radio buttons, then only one selection can be made, as in the Date panel.
-
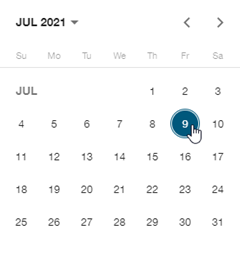
In the Date panel, you can select a Custom date range.

Click anywhere in the From field to open a date-picker dialog. On the calendar, select a beginning date. Repeat this process for the To field and select an end date.
-
In the Tenant panel, select an existing tenant from the dropdown menu.
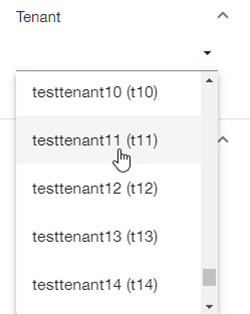
Once you select a tenant, the Tenant filter becomes active (
).